If you’re a professional ASP.NET Core developer in today’s world, you’re likely working on some form of JSON-over-HTTP project. In fact, building web APIs is arguably the strongest use case for ASP.NET Core today. We build APIs so that other developers can discover, learn, and consume our work, all with a strong emphasis on secure access. With those goals in mind, teams often turn to OpenAPI specifications and Swagger to help others better understand said APIs.
As you may know, Duende provides best-in-class products to help secure .NET solutions using the latest standards of OAuth and OpenID Connect. In this post, we’ll see how to secure an ASP.NET Core API with JWT Bearer tokens, set up the solution to generate an OpenAPI specification, and then secure calls from a Swagger UI to authenticate against Duende’s IdentityServer demo instance. All you’ll need is a single ASP.NET Core project, but what you learn will apply to all Duende IdentityServer deployments.
Setting up the API project
Note: All library versions in this tutorial target .NET 10, so class names may differ in lower package versions, such as .NET 9.
We’ll start with a simple ASP.NET Core project using the Empty template. This template creates a Minimal API project with a single endpoint.
var builder = WebApplication.CreateBuilder(args);
var app = builder.Build();

app.MapGet("/", () => "Hello World!");

app.Run();
So far, so good. Let’s add the Microsoft.AspNetCore.Authentication.JwtBearer package to our project.
dotnet package add Microsoft.AspNetCore.Authentication.JwtBearer
We’ll now configure our JWT Bearer authentication options and add a brand-new API endpoint.
using System.Security.Claims;

var builder = WebApplication.CreateBuilder(args);

builder.Services.AddAuthentication()
    .AddJwtBearer(options =>
    {
        options.Authority = "https://demo.duendesoftware.com";
        options.Audience = "api";
        options.TokenValidationParameters = new()
        {
            NameClaimType = "name",
            RoleClaimType = "role"
        };
    });

builder.Services.AddAuthorization();

var app = builder.Build();

app.MapGet("/", () => "Hello World!");
app.MapGet("/api/random", (ClaimsPrincipal user) =>
        new
        {
            name = user.Identity?.Name,
            value = Random.Shared.Next(1, 100)
        })
    .RequireAuthorization();

app.Run();
Opening a browser and requesting a response from /api/random should return a 401 Unauthorized response. Let’s move on to adding our OpenAPI specification.
Adding OpenAPI Specifications
To use Microsoft’s OpenAPI specification, we will need to add the following package to our existing ASP.NET Core project.
dotnet package add Microsoft.AspNetCore.OpenApi
This library generates the OpenAPI specification by traversing all known endpoints in our project and adding them to a JSON endpoint. Let’s update our code with a few goals in mind.
- Add OpenAPI code to our services collection with options
- Map the OpenAPI JSON specification endpoint
- Exclude the “Hello, World” endpoint from the specification
using System.Security.Claims;

var builder = WebApplication.CreateBuilder(args);

builder.Services.AddAuthentication()
    .AddJwtBearer(options =>
    {
        options.Authority = "https://demo.duendesoftware.com";
        options.Audience = "api";
        options.TokenValidationParameters = new()
        {
            NameClaimType = "name",
            RoleClaimType = "role"
        };
    });

builder.Services.AddAuthorization();
builder.Services.AddOpenApi(options =>
{
    // todo: add security definition
});

var app = builder.Build();

// maps to /openapi/v1.json
app.MapOpenApi();

app.MapGet("/", () => "Hello World!")
    // ignore this endpoint from OpenAPI document
    .ExcludeFromDescription();

app.MapGet("/api/random", (ClaimsPrincipal user) =>
        new
        {
            name = user.Identity?.Name,
            value = Random.Shared.Next(1, 100)
        })
    .RequireAuthorization();

app.Run();
Visiting the endpoint /openapi/v1.json in the browser should now return the ASP.NET Core application’s OpenAPI specification.
{
  "openapi": "3.1.1",
  "info": {
    "title": "OpenApiSample | v1",
    "version": "1.0.0"
  },
  "servers": [
    {
      "url": "http://localhost:5155/"
    }
  ],
  "paths": {
    "/api/random": {
      "get": {
        "tags": [
          "OpenApiSample"
        ],
        "responses": {
          "200": {
            "description": "OK",
            "content": {
              "application/json": {
                "schema": {
                  "$ref": "#/components/schemas/AnonymousTypeOfstringAndint"
                }
              }
            }
          }
        }
      }
    }
  },
  "components": {
    "schemas": {
      "AnonymousTypeOfstringAndint": {
        "required": [
          "name",
          "value"
        ],
        "type": "object",
        "properties": {
          "name": {
            "type": [
              "null",
              "string"
            ]
          },
          "value": {
            "pattern": "^-?(?:0|[1-9]\\d*)$",
            "type": [
              "integer",
              "string"
            ],
            "format": "int32"
          }
        }
      }
    }
  },
  "tags": [
    {
      "name": "OpenApiSample"
    }
  ]
}
You’ll notice there is no mention of security requirements in the JSON document, even if the API expects incoming requests to be authenticated. Let’s fix that next.
Adding an OpenAPI Security Requirement
The OpenAPI specification allows developers to add security requirements to all endpoints defined in the document. The Microsoft OpenAPI library exposes mutable functionality through the document transformer abstraction. We’ll be using a transformer to modify the OpenAPI document and add a global security requirement for all endpoints.
When it comes to web security, there are a few options, but we’re interested in using Duende IdentityServer to generate a JWT that our Swagger UI can use.
Before we get too far ahead of ourselves, let’s add the security requirement to our OpenAPI scheme.
using System.Security.Claims;
using Microsoft.OpenApi;

var builder = WebApplication.CreateBuilder(args);

builder.Services.AddAuthentication()
    .AddJwtBearer(options =>
    {
        options.Authority = "https://demo.duendesoftware.com";
        options.Audience = "api";
        options.TokenValidationParameters = new()
        {
            NameClaimType = "name",
            RoleClaimType = "role"
        };
    });

builder.Services.AddAuthorization();
builder.Services.AddOpenApi(options =>
{
    options.AddDocumentTransformer((document, context, cancellationToken) =>
    {
        // Ensure instances exist
        document.Components ??= new OpenApiComponents();
        document.Components.SecuritySchemes ??= new Dictionary<string, IOpenApiSecurityScheme>();


        // Add OAuth2 security scheme (Authorization Code flow only)
        document.Components.SecuritySchemes.Add("oauth2", new OpenApiSecurityScheme
        {
            Type = SecuritySchemeType.OAuth2,
            Flows = new OpenApiOAuthFlows
            {
                AuthorizationCode = new OpenApiOAuthFlow
                {
                    AuthorizationUrl = new Uri("https://demo.duendesoftware.com/connect/authorize"),
                    TokenUrl = new Uri("https://demo.duendesoftware.com/connect/token"),
                    Scopes = new Dictionary<string, string>
                    {
                        { "api", "Access the Weather API" },
                        { "openid", "Access the OpenID Connect user profile" },
                        { "email", "Access the user's email address" },
                        { "profile", "Access the user's profile" }
                    }
                }
            }
        });

        // Apply security requirement globally
        document.Security = [
            new OpenApiSecurityRequirement
            {
                {
                    new OpenApiSecuritySchemeReference("oauth2"),
                    ["api", "profile", "email", "openid"]
                }
            }
        ];

        // Set the host document for all elements
        // including the security scheme references
        document.SetReferenceHostDocument();

        return Task.CompletedTask;
    });
});

var app = builder.Build();

// maps to /openapi/v1.json
app.MapOpenApi();

app.MapGet("/", () => "Hello World!")
    // ignore this endpoint from OpenAPI document
    .ExcludeFromDescription();

app.MapGet("/api/random", (ClaimsPrincipal user) =>
        new
        {
            name = user.Identity?.Name,
            value = Random.Shared.Next(1, 100)
        })
    .RequireAuthorization();

app.Run();
Essential to adding an OAuth security requirement is setting the authorization and token URLs to point to the demo instance of Duende IdentityServer at demo.duendesoftware.com. The demo instance will be our token service, but you may substitute your own. To meet our global security requirements, we set the required scopes that the user must have to issue a successful API request.
Now, let’s get to the fun part. Putting it all together with the Swagger UI.
Adding the Swagger UI
Adding the Swagger UI is a personal choice: you can use an NPM package, host the files statically, or take another approach. For tutorial purposes, the most straightforward approach is to use the existing Swashbuckle package. In the same project, let’s add the package and set up our options.
dotnet package add Swashbuckle.AspNetCore.SwaggerUI
From here, we need to connect our specification and UI element. Let’s modify our code one last time. We have three tasks to accomplish in this step.
- Map the Swagger UI endpoint.
- Point swagger to our OpenAPI specification
- Enable Proof of Key Exchange (PKCE) for OAuth
using System.Security.Claims;
using Microsoft.OpenApi;

var builder = WebApplication.CreateBuilder(args);

builder.Services.AddAuthentication()
    .AddJwtBearer(options =>
    {
        options.Authority = "https://demo.duendesoftware.com";
        options.Audience = "api";
        options.TokenValidationParameters = new()
        {
            NameClaimType = "name",
            RoleClaimType = "role"
        };
    });

builder.Services.AddAuthorization();
builder.Services.AddOpenApi(options =>
{
    options.AddDocumentTransformer((document, context, cancellationToken) =>
    {
        // Ensure instances exist
        document.Components ??= new OpenApiComponents();
        document.Components.SecuritySchemes ??= new Dictionary<string, IOpenApiSecurityScheme>();


        // Add OAuth2 security scheme (Authorization Code flow only)
        document.Components.SecuritySchemes.Add("oauth2", new OpenApiSecurityScheme
        {
            Type = SecuritySchemeType.OAuth2,
            Flows = new OpenApiOAuthFlows
            {
                AuthorizationCode = new OpenApiOAuthFlow
                {
                    AuthorizationUrl = new Uri("https://demo.duendesoftware.com/connect/authorize"),
                    TokenUrl = new Uri("https://demo.duendesoftware.com/connect/token"),
                    Scopes = new Dictionary<string, string>
                    {
                        { "api", "Access the Weather API" },
                        { "openid", "Access the OpenID Connect user profile" },
                        { "email", "Access the user's email address" },
                        { "profile", "Access the user's profile" }
                    }
                }
            }
        });

        // Apply security requirement globally
        document.Security = [
            new OpenApiSecurityRequirement
            {
                {
                    new OpenApiSecuritySchemeReference("oauth2"),
                    ["api", "profile", "email", "openid"]
                }
            }
        ];

        // Set the host document for all elements
        // including the security scheme references
        document.SetReferenceHostDocument();

        return Task.CompletedTask;
    });
});

var app = builder.Build();

// maps to /openapi/v1.json
app.MapOpenApi();

// add Swagger UI and point to the OpenAPI document
// also enable PKCE for OAuth2
app.UseSwaggerUI(options =>
{
    options.SwaggerEndpoint("/openapi/v1.json", "v1");
    options.OAuthUsePkce();
});

app.MapGet("/", () => "Hello World!")
    // ignore this endpoint from OpenAPI document
    .ExcludeFromDescription();

app.MapGet("/api/random", (ClaimsPrincipal user) =>
        new
        {
            name = user.Identity?.Name,
            value = Random.Shared.Next(1, 100)
        })
    .RequireAuthorization();

app.Run();
We must enable Proof of Key Exchange (PKCE), or authentication with our Duende IdentityServer instance will fail. Enabling PKCE is a current best practice, so we recommend enabling it in your identity provider.
That’s it, let’s test our Swagger UI against our secured API.
Testing Swagger with a Secure API
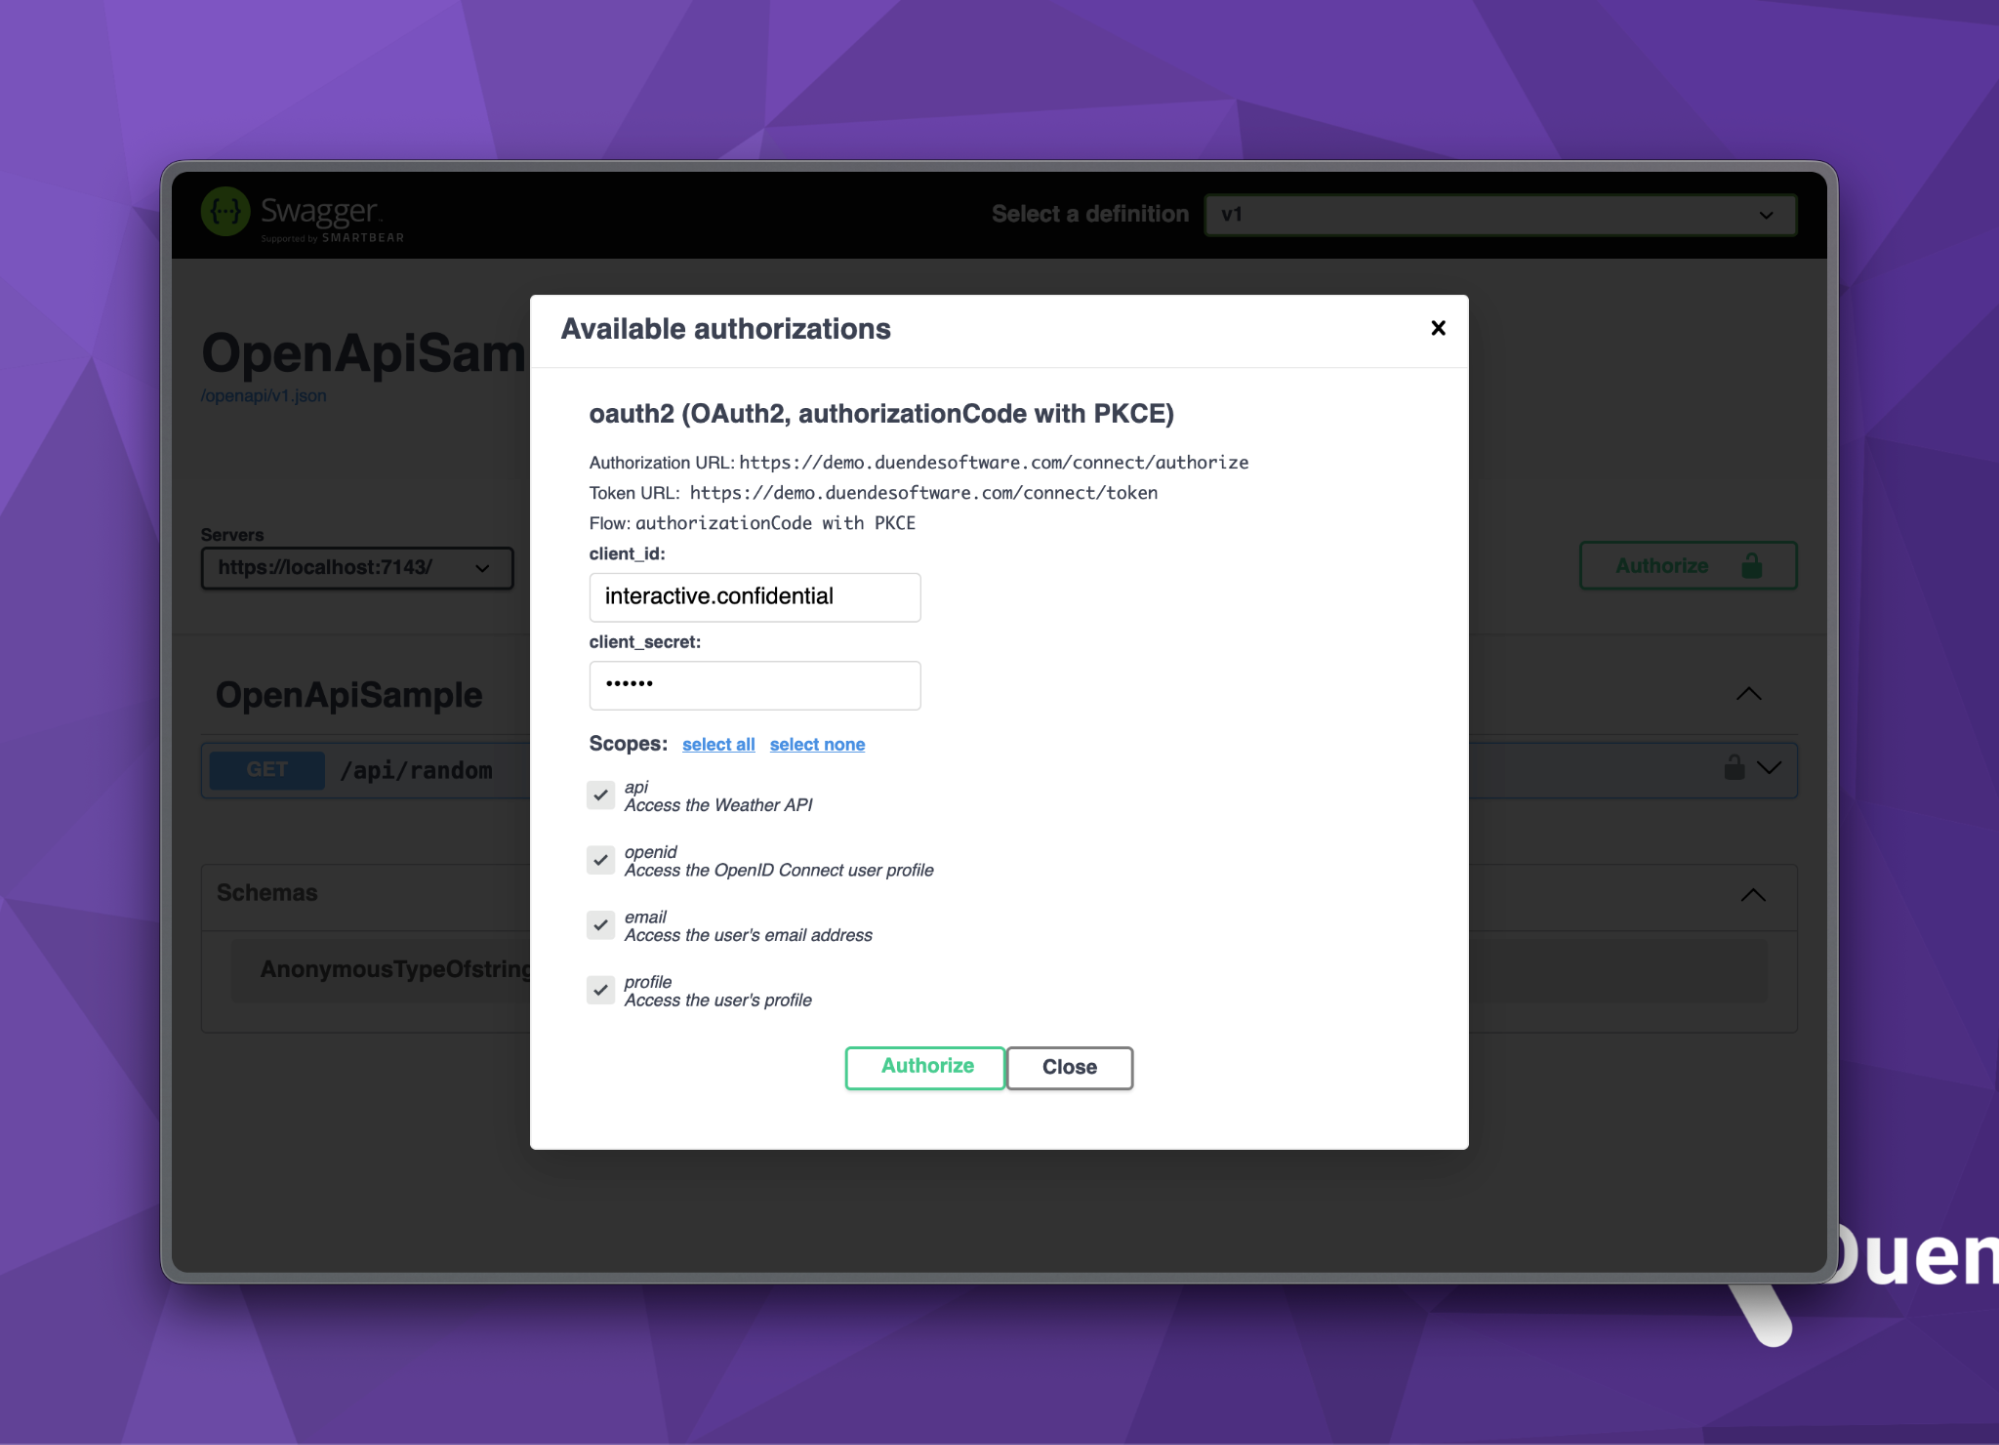
Since we’re using a secure endpoint, we need some information about our identity provider, mainly the following data points.
- Client ID:
interactive.confidential - Client Secret:
secret
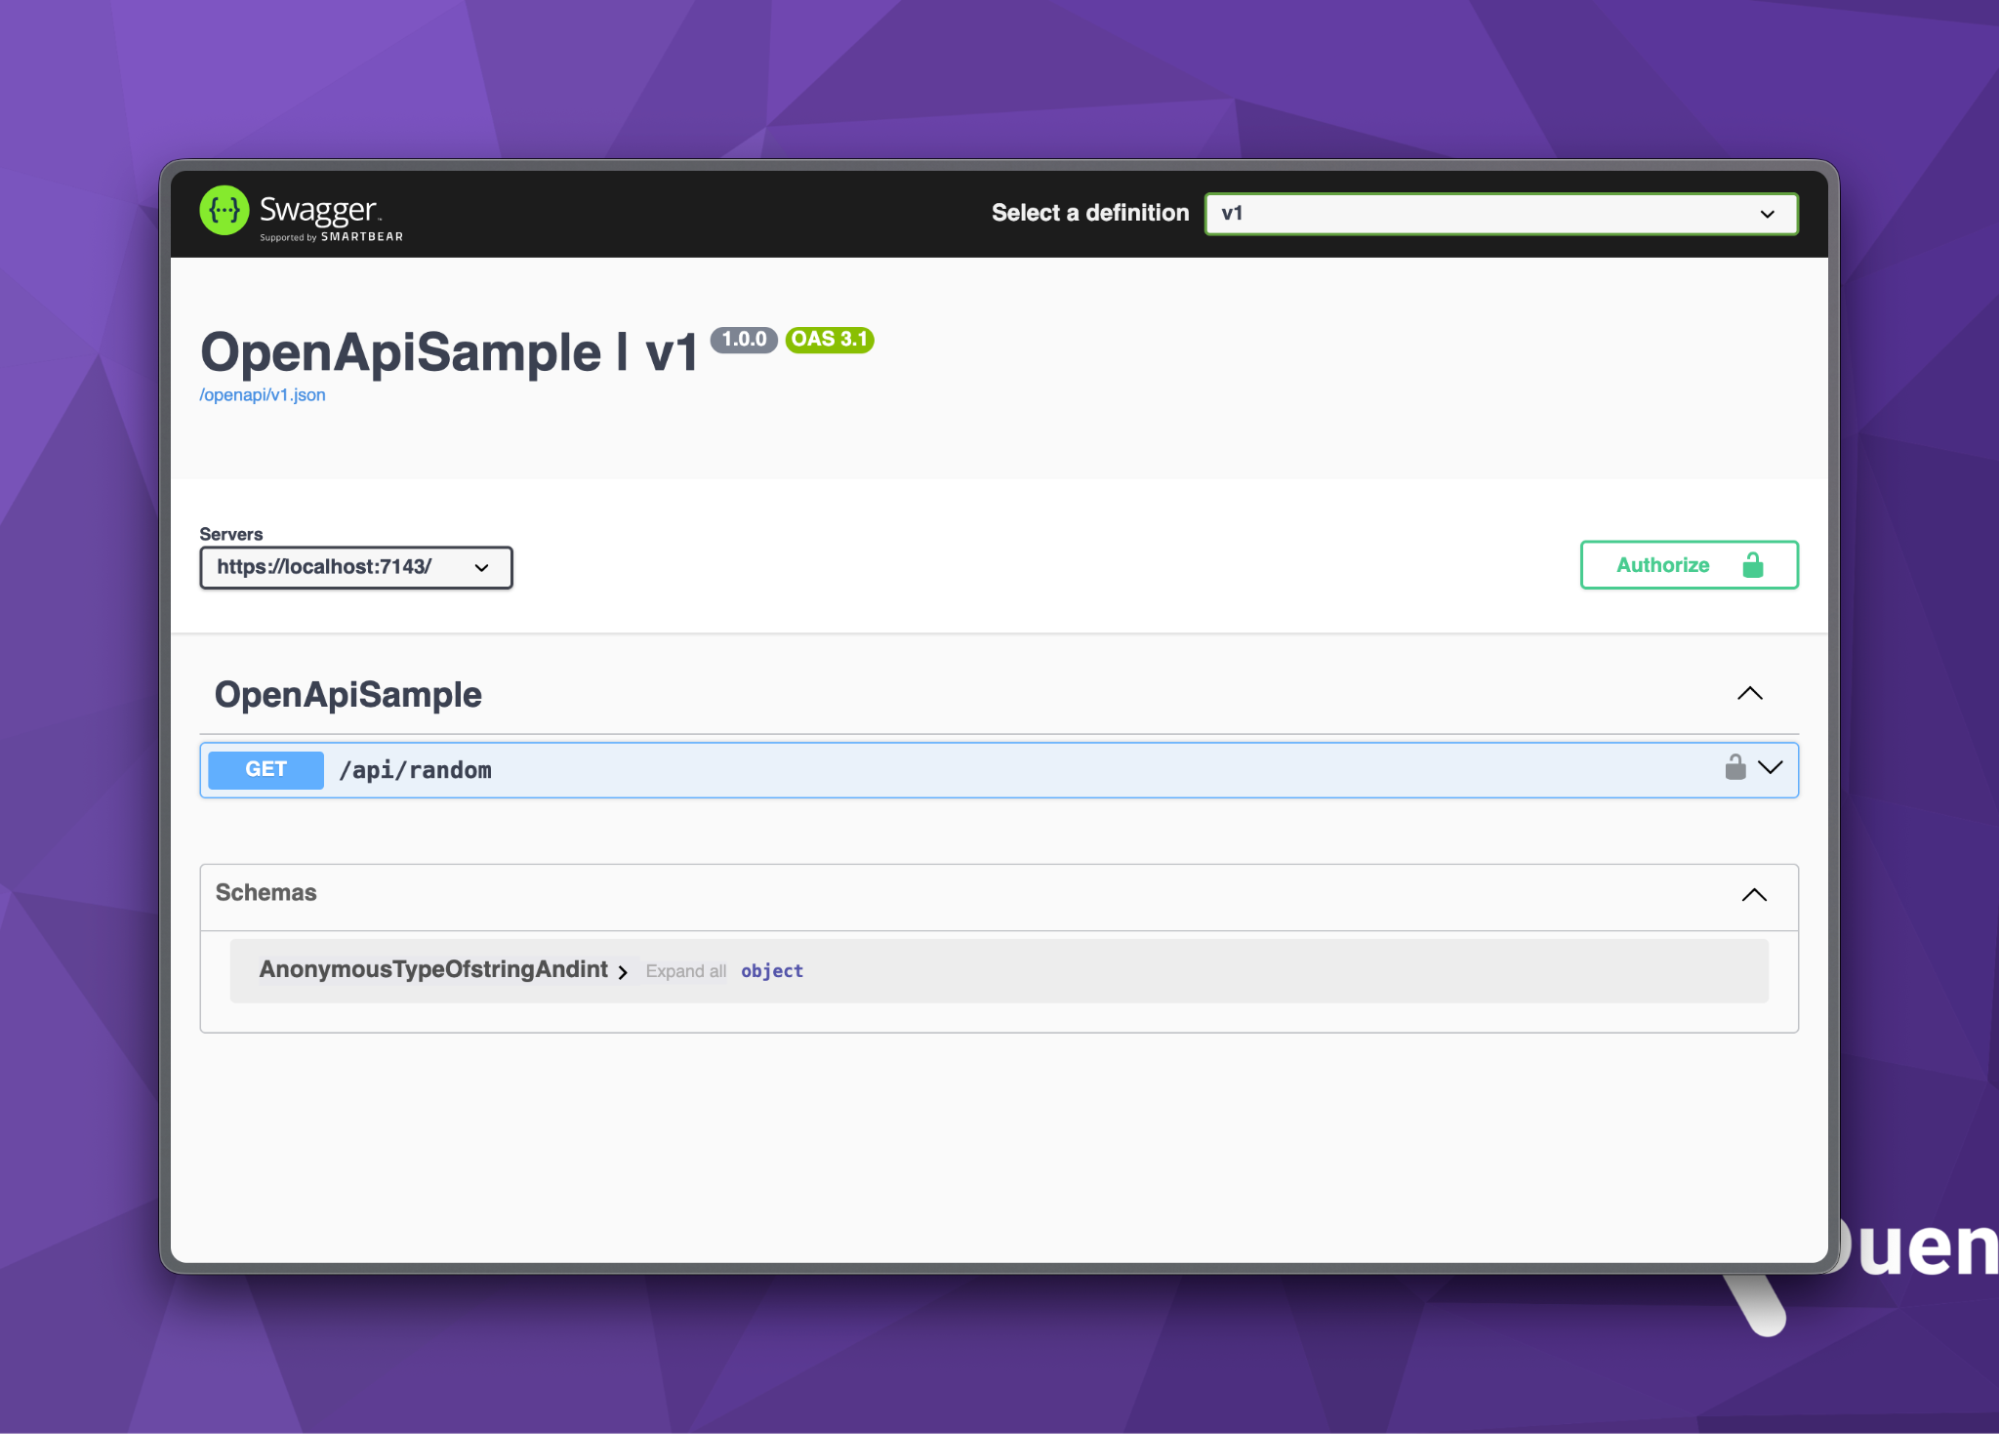
Once we start our ASP.NET Core project, we can navigate to /swagger/index.html to view the Swagger user interface. Importantly, be sure to start your application on HTTPS.

Clicking the green Authorize button displays a dialog box where you can enter the client_id and client_secret from above, and select all the scopes. Before clicking the Authorize button in the dialog, verify that the flow value is authorizationCode with PKCE. If not, you forgot to enable the feature in the Swagger options in your C# code.

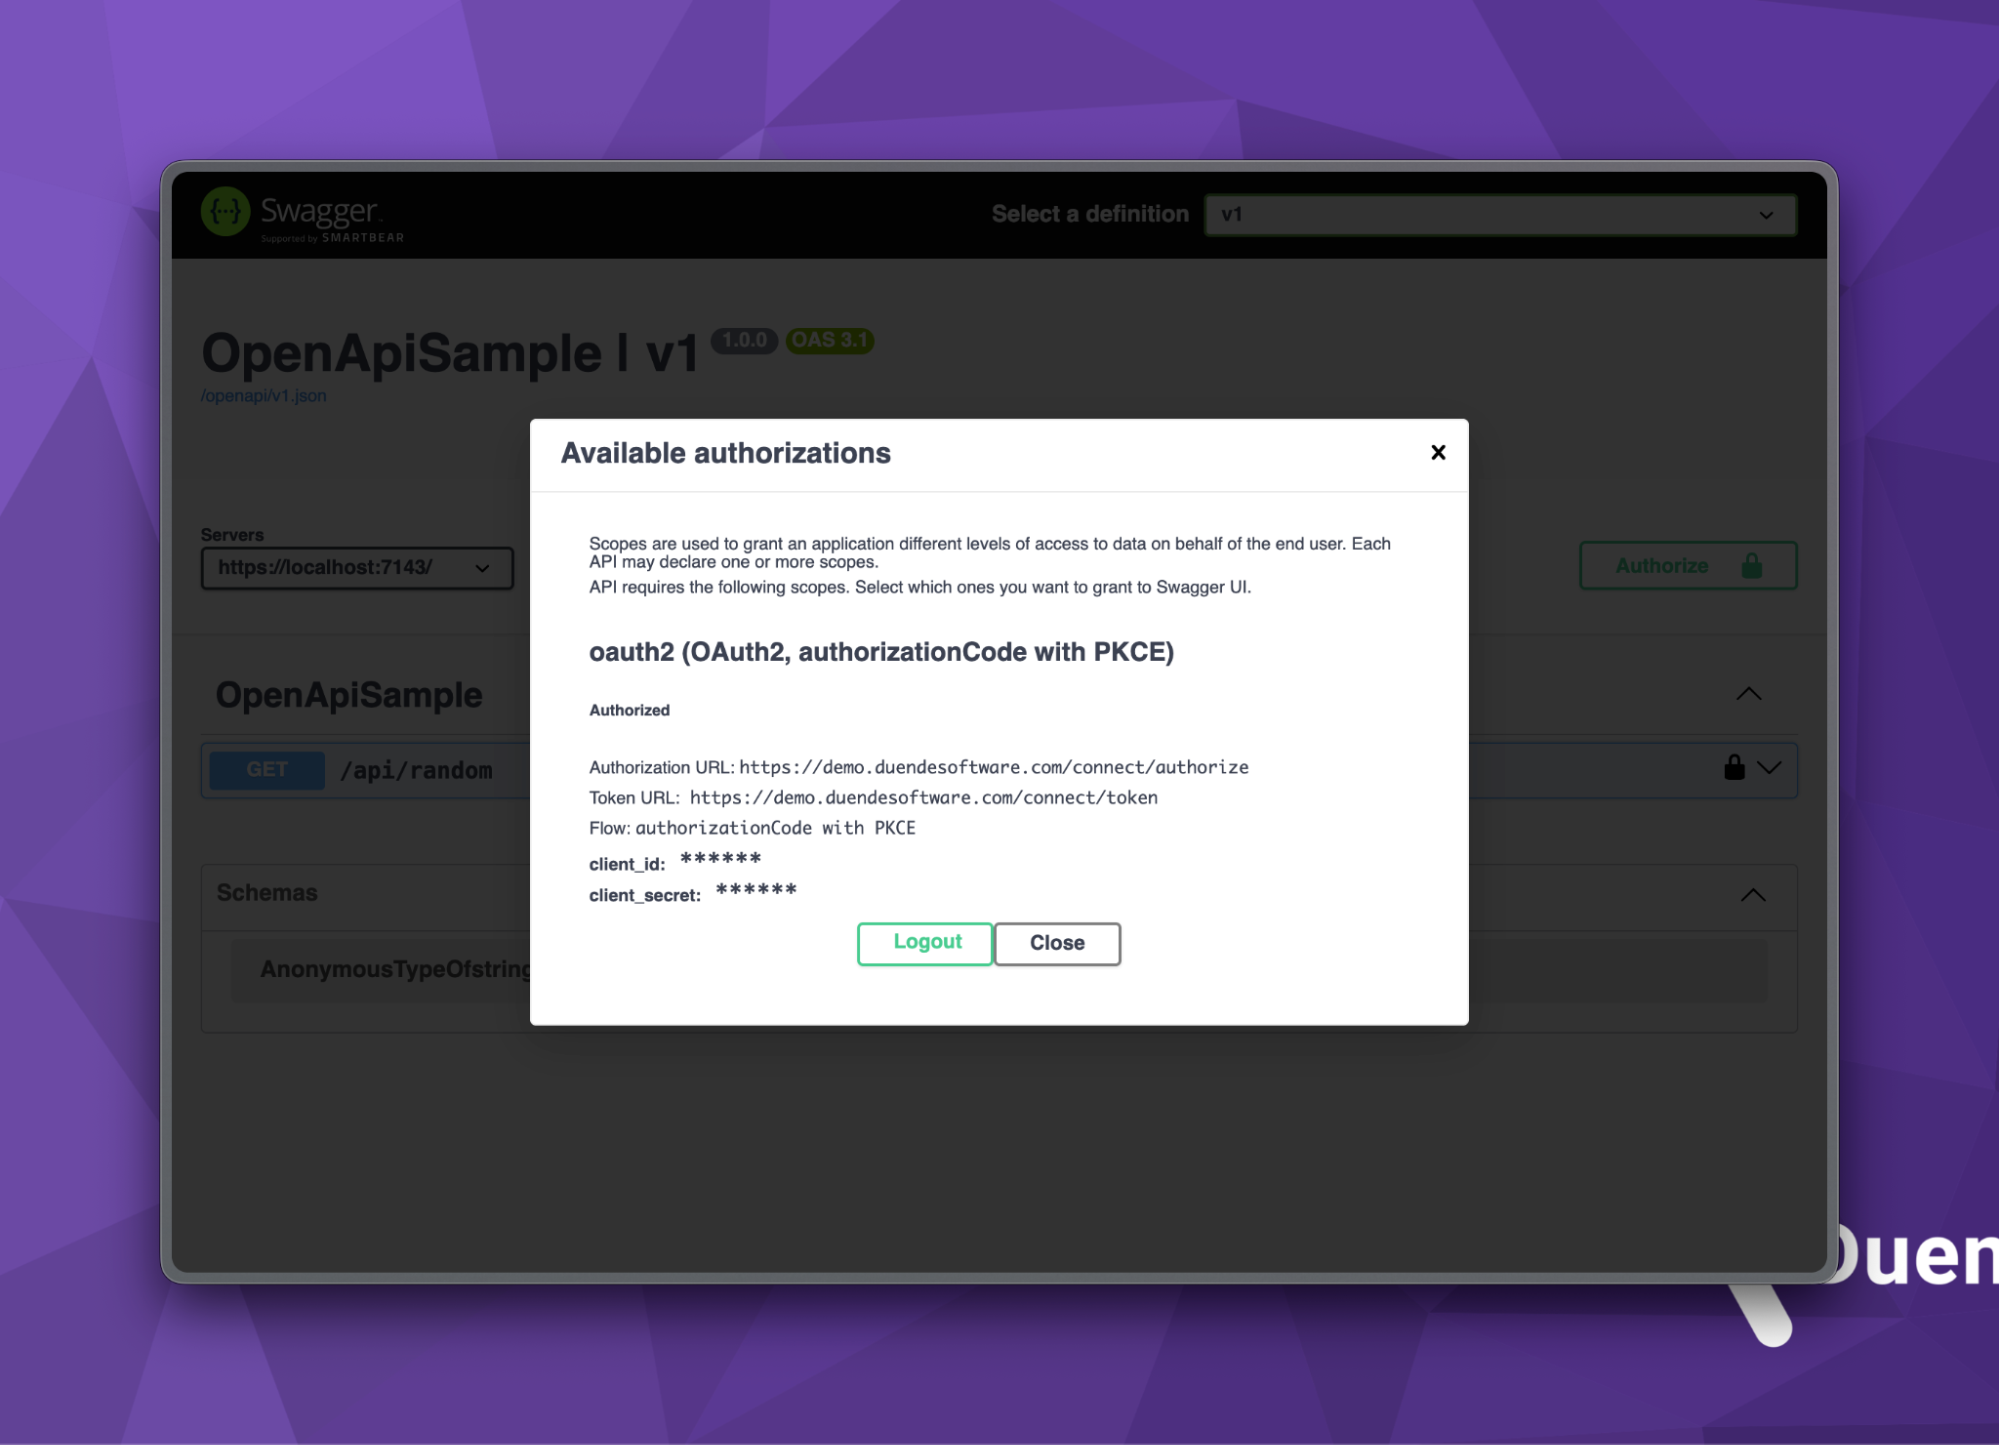
Clicking Authorize will redirect you to the Duende IdentityServer instance, where you can now log in using the username and password combination of bob and bob.

Once redirected back, you should see the following screen with clear Logout and Close buttons.

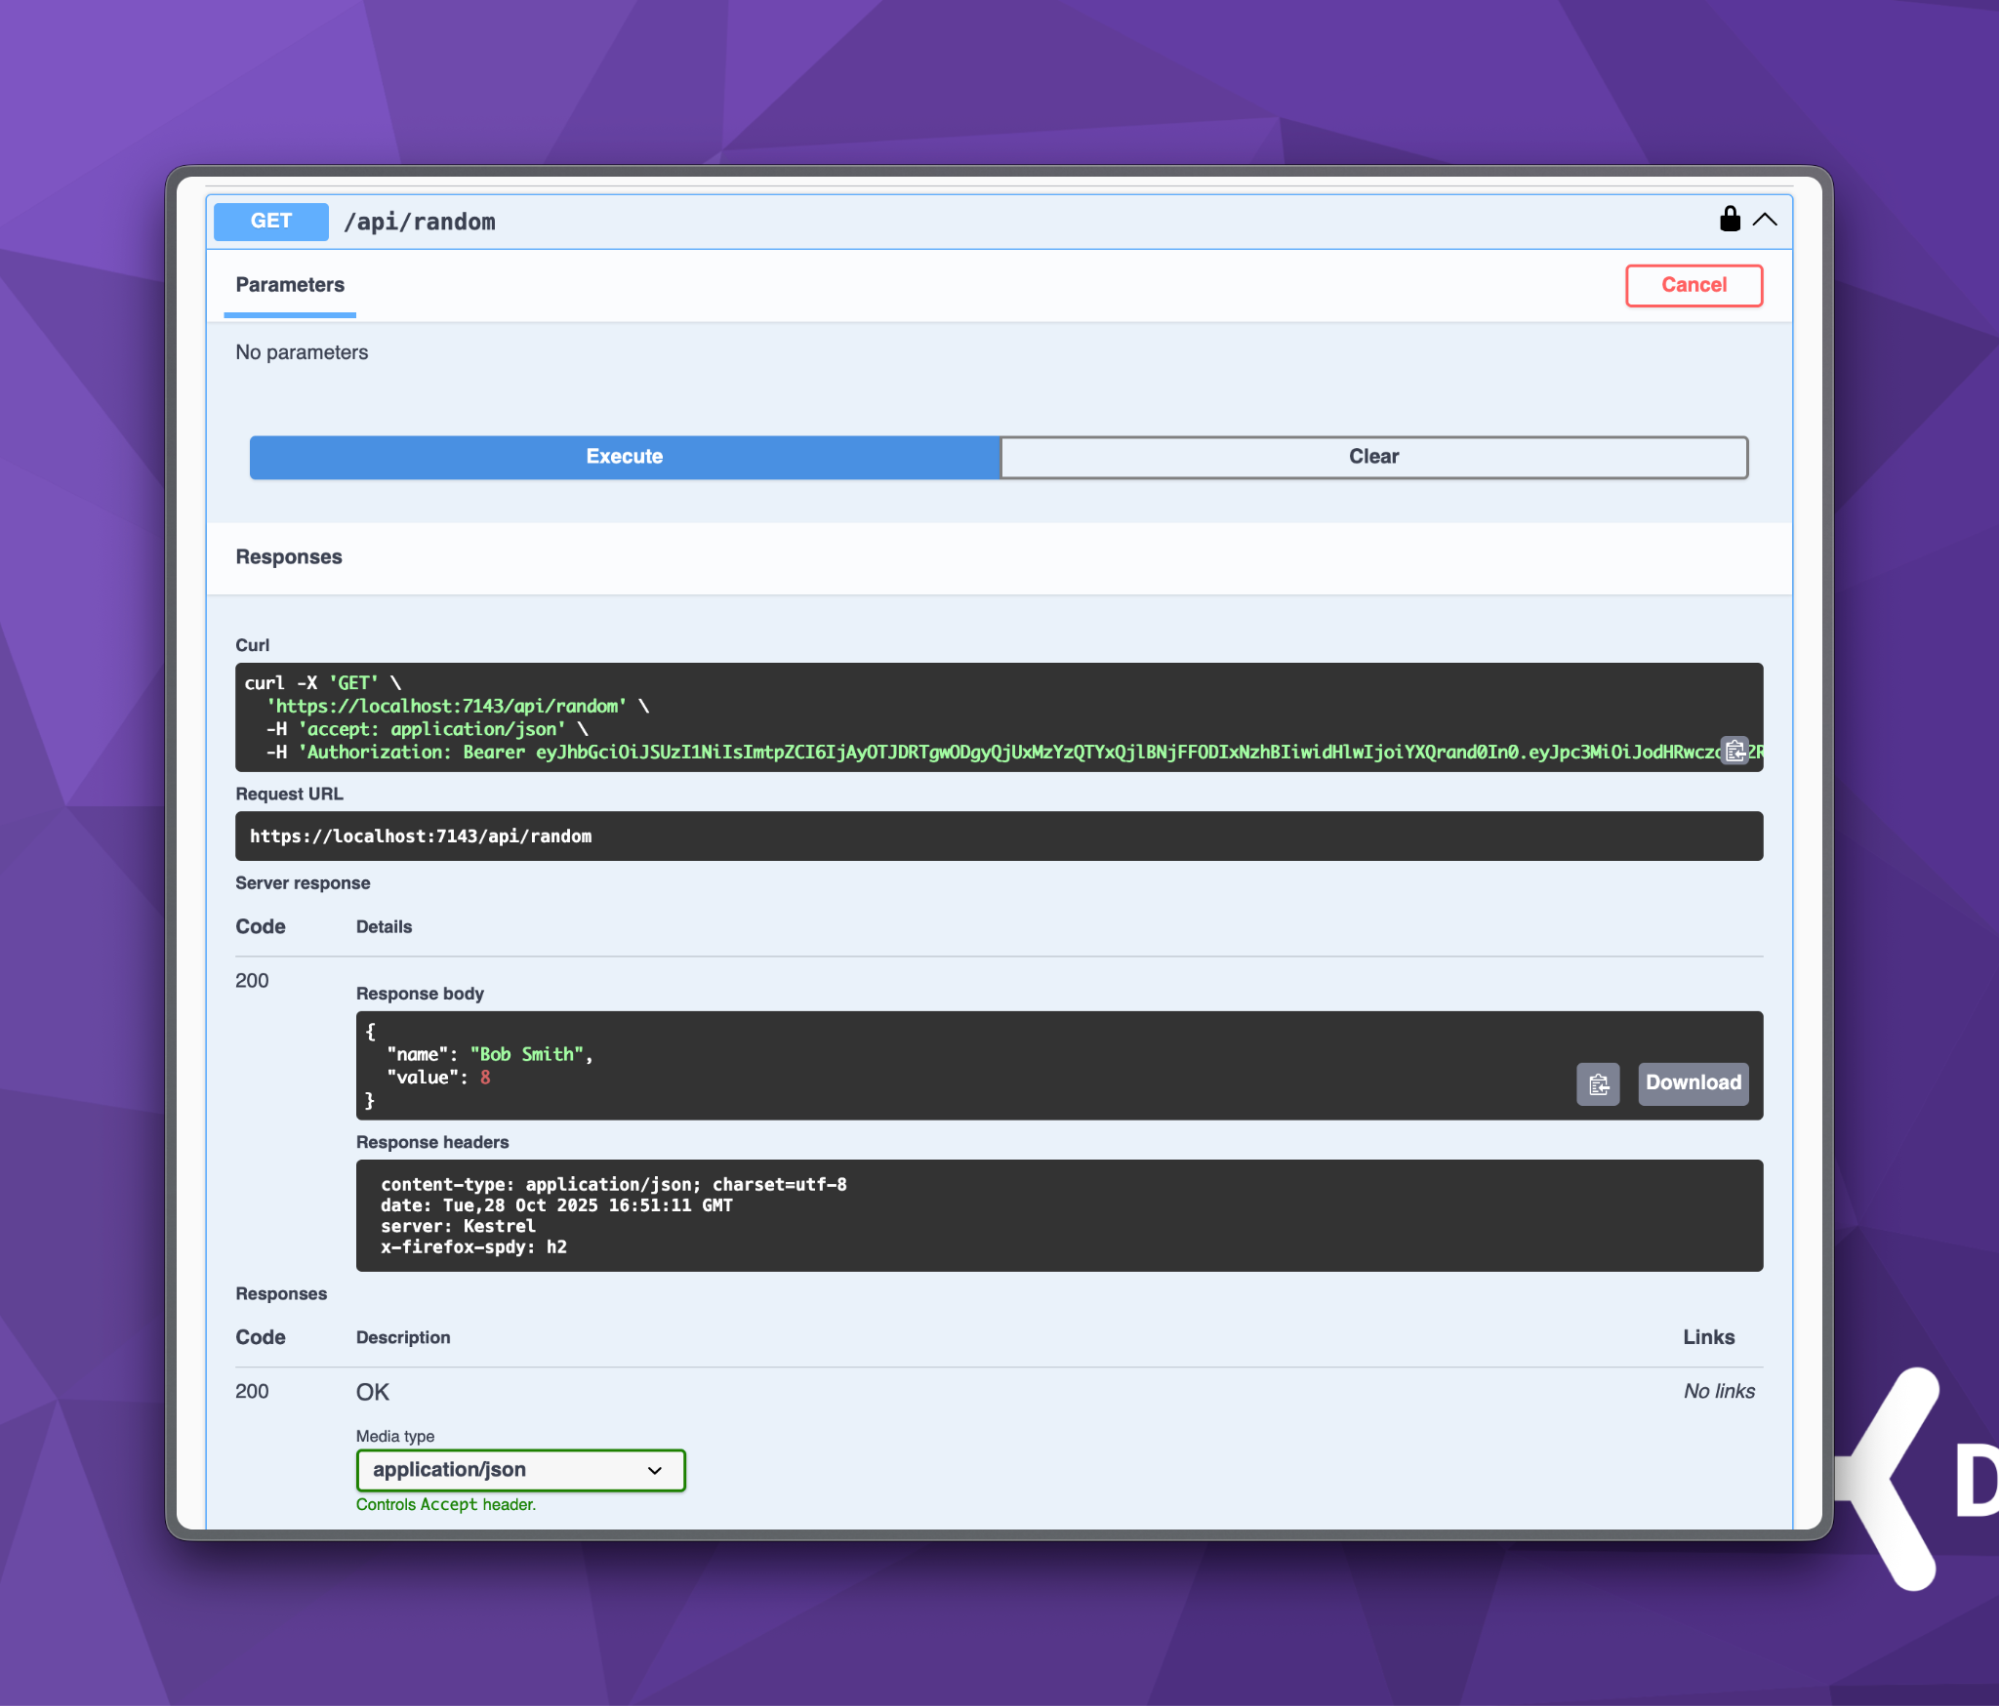
Let’s close this dialog and test our /api/random endpoint. Clicking the Try it out button will now issue a secure request to our endpoint with a JSON response.

Note that the curl command includes the Authorization Bearer header, which contains the JWT issued by Duende IdentityServer. You’ll also notice the value of “Bob Smith” in our JSON response, one of the claims found in the JWT, along with a random integer value generated on the server.
Conclusion
In this post, you’ve hopefully succeeded at building an ASP.NET Core application secured by Duende IdentityServer and OAuth and JWT bearer tokens, along with creating an OpenAPI specification that advertises the necessary security requirements for all API endpoints. Finally, you empowered developers with the Swagger UI provided by the Swashbuckle library. As you build ASP.NET Core-powered web APIs, we hope you keep security a top priority and consider Duende IdentityServer as an option for your security stack.
As always, thank you for reading, and please feel free to leave comments or any questions below.
